
You have unlimited access as a PRO member
You are receiving a free preview of 3 lessons
Your free preview as expired - please upgrade to PRO
Contents
Recent Posts

- Object Oriented Programming With TypeScript
- Angular Elements Advanced Techniques
- TypeScript - the Basics
- The Real State of JavaScript 2018
- Cloud Scheduler for Firebase Functions
- Testing Firestore Security Rules With the Emulator
- How to Use Git and Github
- Infinite Virtual Scroll With the Angular CDK
- Build a Group Chat With Firestore
- Async Await Pro Tips
Redux From Scratch With Angular and RxJS
Episode 118 written by Jeff Delaney
Health Check: This lesson was last reviewed on and tested with these packages:
- Angular v6
- RxJS v6.2
Find an issue? Let's fix it
Source code for Redux From Scratch With Angular and RxJS on Github
Building your own state management solution in Angular from scratch is surprisingly easy - at a fundamental level anyway. In this lesson, you will learn the core concepts behind redux, as well as some very useful RxJS techniques like custom operators and multicasting. My goal is to help you understand how to setup state management from the ground up, but also to understand the underlying principles if you use a library like NgRx or NGXS.
One major benefit of building your own state management tool is that you can create your own abstractions to reduce boilerplate code. Redux is notorious for its large code footprint, but you can use convention over configuration to get all the benefits with far less explicit configuration and duplication.
Concept 0 - What is Redux?
Redux is a pattern/library from the React world that has inspired popular Angular tools like NgRx and NGXS. The purpose of redux is to make application data more predictable by creating a one-way data flow.
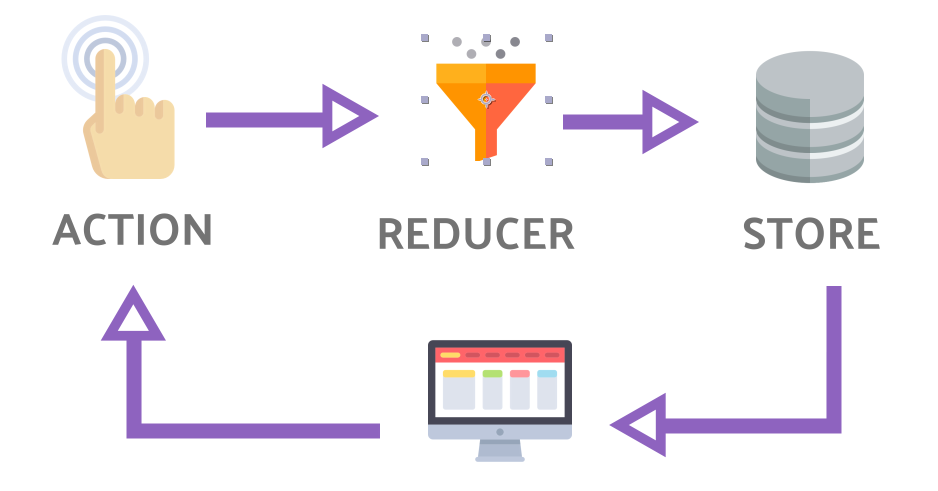
The premise is simple - Your application data is a single immutable object that can only be changed by dispatching actions. Let’s get started by generating a service in Angular to serve as our global state management tool.
ng new reduxApp |
I am also installing Lodash because it provides some helpers that will come in handy and provide better performance than a native implementation.
Our store service only has two properties, both of which are reactive streams of data - actions and state.
import { Injectable } from '@angular/core'; |
Concept 1 - Action Stream
Let’s define an action class to standardize the way changes occur.
export class Action { |
Actions signal a mutation to the state container and provide an optional data payload. It is the actions stream that determines the shape of the state.
Concept 2 - Reducing the State
The state listens to the action stream, then changes the current state object to the next state object. In order to facilitate this task, I am extracting this logic to a custom RxJS operator named reducer.
export class Store { |
The reducer itself is just a switch statement that builds the next state object based on the action that was dispatched to it. Think of this as your event handler - it’s a pure function so I’ve defined as a regular function outside of the Angular service class. I’ve included some code for your basic CRUD operations on an object.
export const reducer = () => |
Concept 3 - Dispatching Actions
Dispatching an action is easy because we’re using an RxJS Subject. We can push the next value into the stream by calling next.
export class Store { |
Concept 4 - Selecting State
Selecting data is a little more complex than it seems on the surface. First of all, we need to observe a deep path from the source state object. Also, we only want this observable to emit data when the it’s scope of interest changes. To handle that magic, we combine the Rx distinctUntilChanged operator with the Lodash isEqual function to perform a deep object comparison.
import { map, distinctUntilChanged, shareReplay } from 'rxjs/operators'; |
Also, we want new subscribers to receive the last value. We can tell our source subject to save the last emitted value with shareReplay and pass 1 because we only need the most recent value to be cached.
export class Store { |
Concept 5 - Pure Components
We have now reached the glorious promised land of pure components, where we only (1) select state or (2) dispatch actions. Components like this are much easier to debug and test.
import { Component } from '@angular/core'; |
And our HTML can unwrap the observables with the async pipe:
<h3>Global State</h3> |
Bonus Concept - Redux Dev Tools
One of the main reasons people like Redux this awesome browser extension called Redux Dev Tools for visualizing state. You probably think it’s hard to wire this thing up, right? Nope, it takes only a few lines of code because we already have the necessary data in our reducer function.
const win = window as any; |
Don’t forget to install the Redux Dev Tools extension from the Chrome web store.
The End
Congrats, you just implemented the hottest state management pattern in web development all by yourself. Now you can build on this to create a lean solution that works exactly the way you want it.